+31 88 5678 333 | Amsterdam | Willemstad | Mail Onze Recruiter
")
")

Wat kun je van ons verwachten
- Een volledige werken-bij site in jouw eigen huisstijl
- Zelf jouw vacatures op je eigen werken-bij omgeving beheren
- Volledig ingerichte recruitment software om jouw kandidatenproces te borgen
- Toegang tot Recruitment Marketing tools om jouw instroom te optimaliseren
- 24/7 inzicht in jouw recruitment KPI’s en marketing data
- Toegang tot de Yoores Kennisbank en Tutorials
- Realtime inzicht in candidate experience
- AVG & GDPR compliant
Recruitmentscan
Thank you for working with A+! To provide clarity about the options in A+, we have created a brief manual for the most commonly used functionalities. Through the tabs below you can find more information about the several topics and we indicate step-by-step which actions you can take and how to carry them out.
If anything is unclear or if you have additional questions about A+? Please contact Kees-Jan Band at 088 - 5678 333 or send an e-mail to .
Dashboard
As soon as you are logged in to A+ the first thing you see is the Dashboard. On the Dashboard you can see on one page all relevant data of the organization to which you have access.
If you have access to multiple organizations, click on the organization on the left side of the page in the navigation window to open the dashboard for that organization.
When you are working in A+, you can always go back to the dashboard by clicking this button

Workload
- When you click on the button

- you will find your personal workload.
- This is an overview of all Actions, Job Interviews, Open telephone interviews and new Applicants of the vacancies to which you are assigned.
- If you want to see an overview of all vacancies (of the organization to which you have access), click on the Show all items button at the top left:

If you want to return to your personal overview, click on Show my Items.
Add new vacancy
This chapter explains step by step how to create a new vacancy and what to look out for.
Step 1
To create a new vacancy, click the button

on the left in A+. After clicking the button, you can select for which department you want to create the vacancy. As soon as you have selected the department, the job creation screen will open automatically.
Pay attention! If you accidentally clicked on the wrong department, go directly to

at the bottom and start again with the first step by clicking the Add New Vacancy button.
Step 2
When you have completed step 1, you will automatically be taken to the job creation screen.
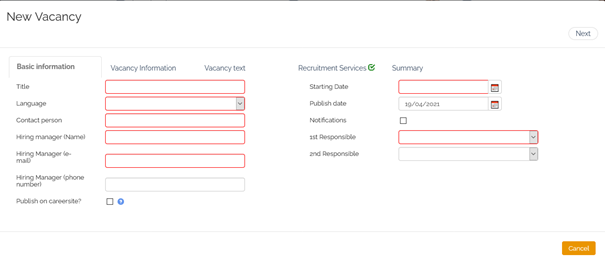
Pay attention! All red-framed fields are mandatory fields. If you do not fill these in, you cannot save the vacancy.
Tab 1 Basic Information
|
Title |
Here you enter the job title.p> |
|
Language |
Select the language that matches the vacancy text here. The application form will be displayed in the language you choose here. |
|
Contact person |
Enter the name Yoores can contact for this vacancy. |
|
Hiring Manager (name) |
Enter the name of the hiring manager |
|
Hiring Manager (email) |
Enter the email address of the hiring manager. |
|
Hiring Manager (phone) |
Enter the phone number of the hiring manager (this is not a mandatory field). |
|
Publish on careersite? |
Check this box if the vacancy can be published directly on your career site. |
|
Starting date |
Enter the date on which you create the vacancy here (usually today). |
|
Publish date |
Enter the date from which the vacancy may be published here. Please note that this date may never be before the starting date. |
|
Notifications |
When you check this option, a new field will open where you can enter an email address. When this option is on, you will receive an notification email with every new applicant. |
|
1st and 2nd responsible |
Each vacancy has a responsible person who manages the application procedures for the vacancy in question in A+. You can select the responsible person from the drop down menu. |
Tab 2 Vacancy Information
|
Sector |
Select the category from the drop down menu that matches the best with the vacancy. |
|
City |
Select the correct location of the vacancy from the drop down menu. The three underlying fields City, Postal code and Country are then filled in automatically. If your location is not listed, feel free to choose one of the options. You can always manually adjust the three underlying fields. |
|
Min. education |
Select the minimum required training from the drop down menu. |
|
Years of experience |
Enter the desired number of years of work experience here. You can only enter one (1) number here and no bandwidth. For example, if 3 to 5 years of experience is required, you take the median. Which in this example is 4. |
|
Salary between.. and .. |
Enter the minimum and maximum salary offered in these two fields. You can either enter a monthly or annual salary. This is very important for the indexing and findability of the vacancy. Only enter numbers here without periods and commas. For example 3200 (per month) or 56000 (per annum). |
|
Publish salary |
When you have entered the salary indication fields, this data will not be published unless you check this box. |
Tab 3 Vacany tekst
In the next tab you can enter the vacancy text in the text fields. Pay attention! When you copy text and paste this into A+, make sure that you then use the formatting (bullit points, headers, etc) of A+. This layout is linked to the styling on the career site. If you don't do this, the vacancy will look messy on the website.
|
Summary |
In this field you enter a short description of the vacancy with a maximum of 4 sentences. |
|
Description |
Here you enter the vacancy text. |
|
Demands |
Here you enter all the job requirements and competencies required for the vacancy. |
Tab 4 Recruitment Services
In this tab you can choose the desired service by turning the options on or off.
Tab 5 Summary
In the summary tab you will see an overview of the options and associated costs that you have chosen in tab 4 Recruitment Services . If the total amount at the bottom of the line is higher than € 0, you will be asked if you want to enter the fields Location, Cost center and PO number. If you are not sure what to enter here? Then enter NA.
When you have entered all fields on all tabs, you can save the vacancy by clicking the Save button in the Summary tab at the bottom.
Add candidate
It sometimes happens that you have obtained the data of an applicant in a different way than via the application form that is linked to the vacancy. Then you can also add the applicant to the vacancy in A+ as follows:
1. Go to the vacancy in A+ to which you want to add the applicant.
2. Click on this button

on the left side of the page.
3. Then fill in all available information about the applicant. You can only save the candidate when you have filled in all the fields. You will then be taken directly to the candidate screen of the person you have just added.
Tip: If you do not have all the details of the candidate? Then fill in a question mark (?) in the relevant field.

button in the candidate screen.

button.
Note: if you have manually added a candidate, he or she will not receive an automatic confirmation of receipt of the application. If you still have to send it, you have to send it manually (see "Update status").
Move applicant
Each applicant in A+ can be moved to another open vacancy. You do this by going to the candidate screen of the relevant applicant.
You will find the button

to the right of the candidate contact details.
You can then navigate to the vacancy where you want to move the candidate to. Click on the relevant vacancy and close by clicking OK.
Important: with this action you will move the candidate to another vacancy and do not make a copy of the candidate. As soon as the candidate has been moved, his or her data will disappear with the vacancy from which it was moved.
Update Status
Through the button

in the candidate screen you have the option to change the status of a candidate. You can also send emails to the candidate and create notes. At "Update Status" you choose the desired action you want to take from the drop-down menu. Below is a brief explanation of the different fields in the Status screen.
|
Execution date |
This is the execution date of the action and defaults to the current date and time. For example, if you want to send an email later, you can adjust the day and time here. |
|
Schedule appointment |
If you send a confirmation email for a first or second job interview, enter the day and time of when the appointment is scheduled. This ensures that it is placed correctly in your appointment overview. A file is automatically added to the email so that the recipient can add the appointment directly to his or her agenda. This also applies to any BCC addresses you have added. |
|
Send as e-mail |
If you want to send an e-mail to an applicant, you must always tick this box. Otherwise the e-mail will not be sent. |
|
BCC addresses |
If you want to send your colleagues or any other third parties a copy of the e-mail, add their e-mail addresses in this field. These are not visible to the candidates. If you want to add multiple addresses, separate them with a comma. |
|
Insert default text |
Standard messages have been added to a number of actions. The default text linked with the action will be added in Notes when you click this option. It concerns the following actions; a Please Call back request, Rejection, Rejection after interview, 1st and 2nd interview. You can always manually adjust the text to your own preferences once you have chosen this option. |
Plan new activity

For example: when you have agreed to hold a telephone interview in 3 days with the applicant.
All actions are visible on your workload page so that you have an overview of all to-do’s.
1. Click on the applicant for whom you want to schedule an action.
button on the right.
3. Make a note of the action to be taken and choose the date on which the action should be executed.
4. The action will appear in the candidate screen and on your Workload page.
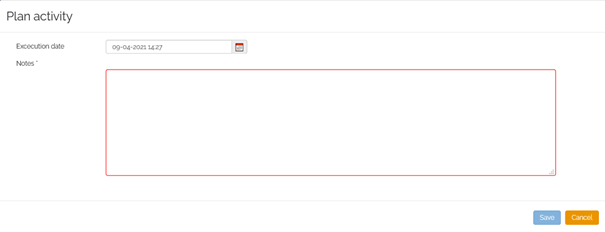
When you have executed an action, click on “complete”. Note: these actions are not logged. As soon as you have clicked on “complete”, the notes you have made in the notes field will also disappear.
.
Search in A+
If you want to search for candidates or (old) vacancies, you can do that via the search field.
In A+ you have the option to search by the name of the person or vacancy. At the top left you have the search field where you can enter the search term (for example applicant's name or vacancy name). After clicking the looking glass you then have a couple of options to specify your search term:

Note: you will only see the results of departments / locations that you have access to. And, candidate data is only kept to a limited extent with regards to the GDPR.
Expiring vacancies
When a vacancy has been created it will also have an end date which is has been set to three months after the start date by default.

behind the vacancy title in the vacancy overview in the left navigation column.
If the end date is exceeded, the vacancy will no longer be visible on the career site. Therefore, make sure to extend your end date when the exclamation mark is visible.
Closing a vacancy
The vacancy has been successfully filled or there is another reason that you want to close the vacancy. Before closing the vacancy, always make sure that all open actions and applications have been processed. All candidates must have the status “rejected” or “hired”.
To close a vacancy, take the following steps:
1. Go to the vacancy you want to close.

button on the left.
3. You will now be taken to the window where you can edit the vacancy. To close the vacancy you have to adjust two fields, namely: Status and End date.
4. At Status, choose the correct option from the drop-down menu.
5. At End date, choose the date you will close the vacancy (usually today's date). In any case, never put a date in the past here.

at the top or bottom of the page. Now you have closed the vacancy.
The vacancy is still visible in A+ on the end date. You can always find a vacancy that has been closed by going to the relevant department and unchecking

checkbox.
Pay attention! Not every user has the authorization in A+ to edit and close a vacancy. If you do not have this authorization, you will not see the Edit Vacancy button.
Copy vacancy
If you have several of the same vacancies, or want to post a similar vacancy that you have already filled in the past, there is the option to copy a vacancy.
By copying a vacancy you create a new vacancy. Candidate data of the vacancy you copy will not be transferred to the new vacancy. The statistics of the vacancy that is copied are also not included.
It is technically possible to re-post / reopen a closed vacancy. You only use this option if you have unfairly closed a vacancy. For example, when a candidate ultimately decides not to start and you have to continue with the recruitment procedure.
If you want to create a new vacancy with, for example, the same vacancy title, we do not recommend reopening an existing vacancy. This is because the statistics are no longer correct (for example the time-to-hire, always to the disadvantage of the recruiter) and the vacancy is dated, it will not be properly indexed by search engines. In that case always use the copy option.
1. Open the vacancy you want to copy.
2. Click the

button on the left.
3. Then select the location/department where you want to copy the vacancy to. When you have clicked on the location/department, the window for creating a new vacancy will open.
4. All fields, except start date and salary, have been copied and completed. Check all fields and check whether the information contained therein is correct. And change it if necessary.
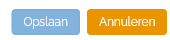
5. When all fields have been filled in correctly, click on Save in the tab Summary. If you are not sure whether you want to copy this vacancy, you can always click on the Cancel button.
Add new user
Within A+ we work with personal data of people. With regards to the General Data Protection Regulation (GDPR), we can therefore not just give everyone access to A+. Within your organization, a person has been appointed who can submit the request to add a new user to us. Usually this is the HR Manager.
You can always ask us who is the appointed person at your organization. Send a message to .
If you want to add a new user, we need the following information: Please also pass this on to the appointed person within your organization when you submit a request for access to A+.
• Name
• Email address
• Job title
Bekijk Video
Bekijk in onderstaande video van 2 minuten hoe onze flexibele Recruitment Services werken voor organisaties in de chemie!
Demo inplannen
Wil je meer informatie over hoe onze Recruitment Services specifiek voor jou kunnen werken?
Vraag direct een demo aan!

Interview tips
- Bereid het gesprek goed voor; lees het CV goed door en schrijf je belangrijkste vragen aan de kandidaat alvast op.
- Introduceer jezelf, neem eventuele nervositeit weg bij de kandidaat en vraag waarom iemand op zoek is naar een nieuwe werkomgeving.
- Neem de (relevante) werkervaring van de kandidaat door en onderzoek wat hij/zij daar heeft bereikt (hierdoor weet je wat je verder wilt vragen).
- Vraag waar iemand het meest trots op is in zijn/haar carrière; vraag goed door en onderzoek of dit goed aansluit.
- Geef aan het einde van het interview jouw indruk aan en meld dat we andere kandidaten spreken. En, vraag wat de indruk van de kandidaat zelf is.
- Sluit af en informeer de kandidaat wanneer hij/zij feedback kan verwachten en wat het verdere verloop van de procedure zal zijn.
Aanvullende tips
- Let op groei en ontwikkeling van de kandidaat.
- Zorg dat je helder hebt wat iemand zegt; vraag anders goed door.
- Wees kritisch, geeft iemand antwoord op het niveau dat je zoekt?
- Kandidaten zullen in eerste instantie generaliseren, groepsprocessen benoemen, niet vanuit de ik-persoon praten. Zorg dat je helder krijgt wat de kandidaat zelf heeft bereikt.
- Graaf verder en laat iemand een organogram tekenen, om meer inzicht in zijn/haar positie in de organisatie te krijgen.
- Begrijp dat je in de eerste ronde nooit alles komt te weten, maar focus je op de belangrijkste vragen die je vooraf zelf hebt bepaald.
Bekijk Video
Bekijk in onderstaande video van 2 minuten hoe onze flexibele Recruitment Services werken voor organisaties in de food!
Download Brochure
Download direct de brochure met informatie over de Yoores Recruitment Services!
Demo inplannen
Wil je meer informatie over hoe onze Recruitment Services specifiek voor jou kunnen werken?
Vraag direct een demo aan!

Zijn wij een match?
Ons unieke recruitment concept is niet voor iedereen, daar kunnen we heel duidelijk over zijn. Maar wil je het heft in eigen hand houden, een krachtige werken-bij site voor jouw organisatie optuigen en alle instroom via die site realiseren, kosten en time-to-hire verlagen en minder afhankelijk worden van werving- en selectiebureaus? Dan zijn wij een match!
Wie is Yoores
Yoores Recruitment Solutions is al ruim 10 jaar actief in de wereld van Recruitment Process Outsourcing. Als leidende partij in RPO markt zijn we gespecialiseerd in het optimaliseren van recruitmentprocessen om het beste talent zo efficiënt en effectief mogelijk aan jouw organisatie te verbinden, op maat en volledig client-branded. Het verschil met traditionele RPO oplossingen is dat onze RPO volledig in dienst staat van jou. Dit doen we door je de volledige controle te geven over het wervingsproces waarbij je zelf bepaalt welke activiteiten je zelf uitvoert en welke activiteiten je aan ons overlaat. Zo flexibel was RPO nog nooit!
- Meer dan 50 klanten geholpen
- Meer dan 7.500 vacatures succesvol ingevuld
- Volledige borging van het kandidatenproces
- Invulpercentage van 96%
- Totale besparing van ruim € 25 miljoen voor ons klanten*
- Totaal Netwerk van 7.000.000+ werkzoekenden
- Openingstijden Recruitment Center van 8.30 tot 23:00
*Afgezet tegen hires via W&S/uitzend bureaus